블로그 개설 후 첫 게시물!
LinearLayout 에 대해 적어보려고 합니다.
LinearLayout : 선형 레이아웃
참고 사이트 : developer.android.com/guide/topics/ui/layout/linear?hl=ko
선형 레이아웃 | Android 개발자 | Android Developers
LinearLayout은 세로 또는 가로의 단일 방향으로 모든 하위 요소를 정렬하는 뷰 그룹입니다. LinearLayout이 서로 스택된 상태에서 레이아웃 방향을 지정할 수 있기 때문에, 세로 목록에는 행 하나당 하
developer.android.com
1. 방향 정하기
안드로이드 개발자 가이드 설명을 참고하면 다음과 같이 설명해놓았습니다.
LinearLayout은 세로 또는 가로의 단일 방향으로 모든 하위 요소를 정렬하는 뷰 그룹입니다.
android:orientation 특성을 사용하여 레이아웃 방향을 지정할 수 있습니다.
즉, 뷰(위젯)를 가로 또는 세로 방향으로 순서대로 나열하여 놓을 수 있는 레이아웃을 말합니다.
orientation은 '방향' 이라는 뜻을 가지고 있습니다. 따라서 android:orientation 속성을 이용해서
뷰를 가로로 정렬할 것인지, 세로로 정렬할 것인지 지정할 수 있습니다.
orientation의 default 값은 horizontal 입니다.
- android:orientation = "horizontal" LinearLayout 안에서 뷰를 가로 방향으로 정렬
- android:orientation = "vertical" LinearLayout 안에서 뷰를 세로 방향으로 정렬
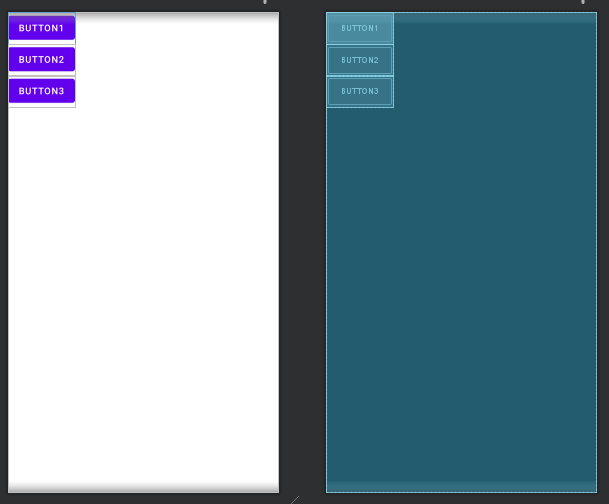
xml 코드로 작성해보겠습니다.
상위 레이아웃의 orientation 속성을 변경해주면 됩니다.
결과는 아래 이미지를 참고하세요.
<?xml version="1.0" encoding="utf-8"?>
<LinearLayout xmlns:android="http://schemas.android.com/apk/res/android"
    xmlns:app="http://schemas.android.com/apk/res-auto"
    xmlns:tools="http://schemas.android.com/tools"
    android:layout_width="match_parent"
    android:layout_height="match_parent"
    tools:context=".MainActivity"
    android:orientation="horizontal">
    <!-- horizontal 또는 vertical 로 지정해줍니다 -->

    <Button
        android:id="@+id/Btn1"
        android:layout_width="wrap_content"
        android:layout_height="wrap_content"
        android:text="Button1"/>

    <Button
        android:id="@+id/Btn2"
        android:layout_width="wrap_content"
        android:layout_height="wrap_content"
        android:text="Button2"/>

    <Button
        android:id="@+id/Btn3"
        android:layout_width="wrap_content"
        android:layout_height="wrap_content"
        android:text="Button3"/>

</LinearLayout>


2. 가중치(비율) 정하기
1번에서 방향에 대해 알아보았으니 이제 크기에 대해 알아봅시당.
LinearLayout은 각각의 하위요소가 화면에서 어느 정도 공간을 차지할 지 설정할 수 있습니다.
android:layout_weight 속성을 이용하여 하위요소의 가중치를 설정할 수 있습니다.
가중치를 통해 해당 뷰가 화면에서 어느 정도의 공간을 차지해야 하는지 중요도를 설정합니다.
쉽게 말하면 이 버튼이 화면에서 얼마나 크게 나와야하는지 정하는 것을 말합니다.
● 동일한 크기의 버튼 만들기
각각의 하위요소가 화면에서 동일한 크기의 공간을 차지하도록 설정해보겠습니다.
이때 주의할 점은, 상위 LinearLayout 의 orientation 속성에 따라 너비 또는 높이 값 중 하나는 0dp 로 설정해야 합니다.
각각의 버튼이 android:layout_weight="1" 속성으로 인해 같은 가중치를 가지게 되어 동일한 크기를 가지게 됩니다.
(만약 1이 아닌 다른 숫자를 주게 된다면 그에 해당하는 가중치만큼 크기가 할당 됩니다.)
- 너비(가로)를 기준으로 같은 크기로 나눌 때 android:layout_width="0dp"
- 높이(세로)를 기준으로 같은 크기로 나눌 때 android:layout_height="0dp"
- android:layout_weight="1"
<?xml version="1.0" encoding="utf-8"?>
<LinearLayout xmlns:android="http://schemas.android.com/apk/res/android"
    xmlns:app="http://schemas.android.com/apk/res-auto"
    xmlns:tools="http://schemas.android.com/tools"
    android:layout_width="match_parent"
    android:layout_height="match_parent"
    tools:context=".MainActivity"
    android:orientation="horizontal">

    <Button
        android:id="@+id/Btn1"
        android:text="Button1"
        android:layout_width="0dp"
        android:layout_height="match_parent"
        android:layout_weight="1"/>
    <Button
        android:id="@+id/Btn2"
        android:text="Button2"
        android:layout_width="0dp"
        android:layout_height="match_parent"
        android:layout_weight="1"/>

    <Button
        android:id="@+id/Btn3"
        android:text="Button3"
        android:layout_width="0dp"
        android:layout_height="match_parent"
        android:layout_weight="1"/>

</LinearLayout>

<?xml version="1.0" encoding="utf-8"?>
<LinearLayout xmlns:android="http://schemas.android.com/apk/res/android"
    xmlns:app="http://schemas.android.com/apk/res-auto"
    xmlns:tools="http://schemas.android.com/tools"
    android:layout_width="match_parent"
    android:layout_height="match_parent"
    tools:context=".MainActivity"
    android:orientation="vertical">

    <Button
        android:id="@+id/Btn1"
        android:text="Button1"
        android:layout_width="match_parent"
        android:layout_height="0dp"
        android:layout_weight="1"/>
    <Button
        android:id="@+id/Btn2"
        android:text="Button2"
        android:layout_width="match_parent"
        android:layout_height="0dp"
        android:layout_weight="1"/>

    <Button
        android:id="@+id/Btn3"
        android:text="Button3"
        android:layout_width="match_parent"
        android:layout_height="0dp"
        android:layout_weight="1"/>

</LinearLayout>

...

    <Button
        android:id="@+id/Btn1"
        android:text="Button1"
        android:layout_width="match_parent"
        android:layout_height="0dp"
        android:layout_weight="1"/>
    <Button
        android:id="@+id/Btn2"
        android:text="Button2"
        android:layout_width="match_parent"
        android:layout_height="0dp"
        android:layout_weight="2"/>
    <!-- weight를 2로 준 경우 -->

    <Button
        android:id="@+id/Btn3"
        android:text="Button3"
        android:layout_width="match_parent"
        android:layout_height="0dp"
        android:layout_weight="1"/>

...

● 임의로 크기 정하기
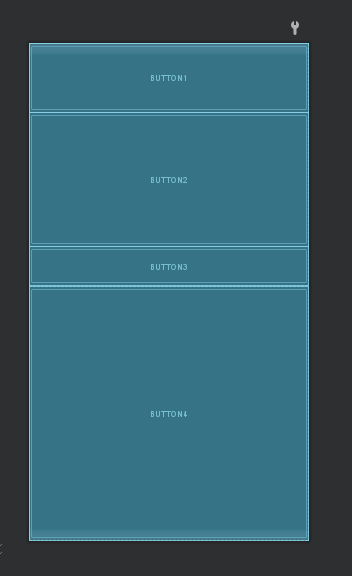
android:weightSum 속성을 이용하면 좀 더 다양하게 뷰의 크기를 지정할 수 있습니다.
부모 LinearLayout에서 android:weightSum 속성을, 하위 뷰에서 android:layout_weight 속성을 부여하여 사용합니다.
예를 들어, LinearLayout에서 weightSum 값을 100으로 줬다면, 해당 레이아웃을 100칸으로 쪼개는 것을 의미합니다.
그리고 하위의 버튼의 weight값을 24로 지정하면, 해당 버튼은 100칸 중 24칸 만큼의 크기를 차지하게 됩니다.
<?xml version="1.0" encoding="utf-8"?>
<LinearLayout xmlns:android="http://schemas.android.com/apk/res/android"
    xmlns:app="http://schemas.android.com/apk/res-auto"
    xmlns:tools="http://schemas.android.com/tools"
    android:layout_width="match_parent"
    android:layout_height="match_parent"
    tools:context=".MainActivity"
    android:orientation="vertical"
    android:weightSum="100">

    <Button
        android:id="@+id/Btn1"
        android:text="Button1"
        android:layout_width="match_parent"
        android:layout_height="0dp"
        android:layout_weight="15"/>
    <Button
        android:id="@+id/Btn2"
        android:text="Button2"
        android:layout_width="match_parent"
        android:layout_height="0dp"
        android:layout_weight="27"/>

    <Button
        android:id="@+id/Btn3"
        android:text="Button3"
        android:layout_width="match_parent"
        android:layout_height="0dp"
        android:layout_weight="8"/>

    <Button
        android:id="@+id/Btn4"
        android:text="Button4"
        android:layout_width="match_parent"
        android:layout_height="0dp"
        android:layout_weight="50"/>

</LinearLayout>

weight만을 이용해 크기를 지정할 때와, weightSum을 이용할 때의 차이점을 아시겠나요? 정리하자면,
- android:layout_weight 속성만을 사용할 경우, 해당 레이아웃 내에서 각 뷰끼리 비율을 따져 크기를 지정하는 방식
- android:weightSum 값만큼 해당 레이아웃을 분할하여 하위 뷰의 크기를 지정해주는 방식
둘 중 어느 것이든 편한 것으로 사용하시면 됩니다.
3. 연습하기
LinearLayout 안에 LinearLayout을 반복 배치하여 아래와 같은 형태로 화면을 구현해보겠습니다.
제가 처음 LinearLayout을 사용할 때 연습했던 화면입니다 ^^;
레이아웃을 구분하기 위해서 android:background 속성을 이용해 배경색을 지정해주었습니다.

<?xml version="1.0" encoding="utf-8"?>
<LinearLayout xmlns:android="http://schemas.android.com/apk/res/android"
    xmlns:app="http://schemas.android.com/apk/res-auto"
    xmlns:tools="http://schemas.android.com/tools"
    android:layout_width="match_parent"
    android:layout_height="match_parent"
    tools:context=".MainActivity"
    android:orientation="vertical">

    <LinearLayout
        android:layout_width="match_parent"
        android:layout_height="0dp"
        android:layout_weight="1"
        android:orientation="horizontal">

        <LinearLayout
            android:layout_width="0dp"
            android:layout_height="match_parent"
            android:layout_weight="1"
            android:background="#ff00ff">
        </LinearLayout>

        <LinearLayout
            android:layout_width="0dp"
            android:layout_height="match_parent"
            android:layout_weight="1"
            android:orientation="vertical">

            <LinearLayout
                android:layout_width="match_parent"
                android:layout_height="0dp"
                android:layout_weight="1"
                android:background="#ff0000">
            </LinearLayout>

            <LinearLayout
                android:layout_width="match_parent"
                android:layout_height="0dp"
                android:layout_weight="1">

                <LinearLayout
                    android:layout_width="0dp"
                    android:layout_height="match_parent"
                    android:layout_weight="1"
                    android:background="#00ff00">
                </LinearLayout>

                <LinearLayout
                    android:layout_width="0dp"
                    android:layout_height="match_parent"
                    android:layout_weight="1"
                    android:orientation="vertical">

                    <LinearLayout
                        android:layout_width="match_parent"
                        android:layout_height="0dp"
                        android:layout_weight="1"
                        android:background="#0000ff">
                    </LinearLayout>

                    <LinearLayout
                        android:layout_width="match_parent"
                        android:layout_height="0dp"
                        android:layout_weight="1"
                        android:orientation="horizontal">

                        <LinearLayout
                            android:layout_width="0dp"
                            android:layout_height="match_parent"
                            android:layout_weight="1"
                            android:background="#ffff00">
                        </LinearLayout>

                        <LinearLayout
                            android:layout_width="0dp"
                            android:layout_height="match_parent"
                            android:layout_weight="1"
                            android:orientation="vertical">

                            <LinearLayout
                                android:layout_width="match_parent"
                                android:layout_height="0dp"
                                android:layout_weight="1"
                                android:background="#00ffff">
                            </LinearLayout>

                            <LinearLayout
                                android:layout_width="match_parent"
                                android:layout_height="0dp"
                                android:layout_weight="1"
                                android:background="#000000">
                            </LinearLayout>

                        </LinearLayout>
                    </LinearLayout>
                </LinearLayout>
            </LinearLayout>
        </LinearLayout>
    </LinearLayout>

    <LinearLayout
        android:layout_width="match_parent"
        android:layout_height="0dp"
        android:layout_weight="1">
    </LinearLayout>

</LinearLayout>'Study > Android' 카테고리의 다른 글
| Unit 1-Pathway4-4 : 주사위 앱에 이미지를 추가해보자 (0) | 2022.05.10 |
|---|---|
| ImageView without contentDescription 경고 (앱의 접근성 확인) (0) | 2022.04.21 |
| Android 문자열 리소스, 하드코딩된 문자열 (strings.xml) (0) | 2022.04.21 |
| 네이버 지도 SDK 빌드 오류 해결 (Failed to resolve/Migrate to Androidx) (0) | 2022.04.13 |
| [Android/Java] FrameLayout (프레임 레이아웃) (0) | 2021.01.21 |
